IDPA Rules Complete Guide: Scoring, Penalties & Everything You Need for Your First Match
Why You Should Understand IDPA Rules Before Your First Match
For most new shooters, the biggest source of anxiety at their first IDPA match isn’t the shooting itself — it’s the fear of accidentally breaking a rule and getting penalized. That concern is perfectly valid. IDPA has considerably more rules than casual range shooting, and many of those rules are fundamentally different from USPSA, especially when it comes to engagement order and the use of cover.
The good news is that IDPA rules follow a logical thread that’s easy to grasp once you see the big picture. The entire rulebook is built around one question: what would you do in a real defensive encounter? Engage the closest threat first, use cover to protect yourself, reload behind safety. When you interpret the rules through the lens of “what if this were real,” most of them stop feeling arbitrary and start making intuitive sense.
This article walks you through the core IDPA rules from start to finish — how scoring works, what gets penalized, and what match day actually looks like. If you haven’t decided on a division yet, check out our IDPA Divisions Explained first. And if you’re deciding between IDPA and USPSA, our IDPA vs USPSA Complete Comparison will help you choose.
The IDPA Scoring System: Time Is Everything
IDPA scoring is simpler than most people expect, but it works very differently from USPSA’s Hit Factor system. In IDPA, your total score is your raw time plus penalty seconds. The lowest total time wins. That’s it.
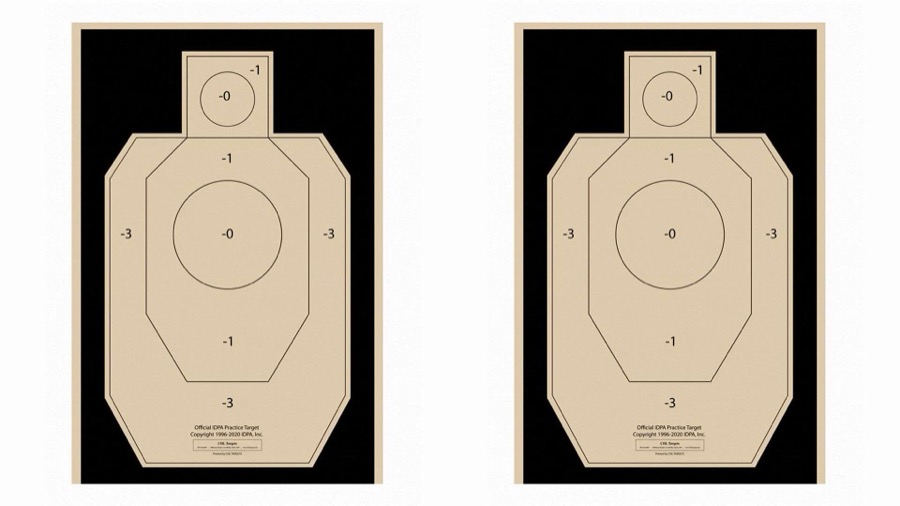
The target zones are labeled in “points down” rather than points earned. The center -0 zone is a perfect hit — no time added. The next ring out is -1, adding one second per hit. The outer -3 zone adds three seconds, and a complete miss adds five seconds. This design forces a genuine tradeoff between speed and accuracy. Spraying shots and racking up -3 hits can easily cost you more time than slowing down to land -0s. Many experienced shooters say the fastest way to shoot IDPA is to shoot accurately — the math almost always works out in favor of clean hits.
The most common scoring method is Vickers Count, which means you can fire as many rounds as you want, but only the best hits count. If a stage calls for two hits per target and you fire three, the scoring system takes your best two. This gives you a safety net — if you know you pulled a shot, you can make it up with an extra round without penalty.
The alternative is Limited Vickers, which restricts you to a specific number of rounds per target. This is much less forgiving: if you fire an extra shot, you not only receive a procedural penalty but your worst hits count instead of your best. It sounds harsh, and it is — the rule is designed to punish undisciplined trigger control, reinforcing the defensive mindset that every round you fire has consequences.
Cover Rules: What Makes IDPA Unique
Ask any experienced IDPA shooter what sets it apart from other competition formats, and nine out of ten will say “the cover rules.” In IDPA, when a stage includes cover positions — walls, doorframes, vehicles, barriers — you are required to use them properly.
Proper use of cover means that 100% of your body from head to toe must be behind the cover object while you’re shooting. Only your gun hand and arm should extend past the cover. The most common mistake new shooters make is “leaning out too far” — your shoulder, hip, or foot slips past the cover without you realizing it, but the Safety Officer standing behind you sees it clearly.
There’s also an important reload rule tied to cover: when you need to reload behind cover, you must step back into a protected position before performing the reload. You can’t stand at the edge of cover, exposed to the “threat,” while swapping magazines. This is one of the most frequent sources of procedural penalties in competition, because under stress it’s natural to forget that one extra step backward.
When moving between cover positions, you should complete your reload before stepping out — not while you’re crossing open ground. In IDPA’s logic, moving between cover positions is when you’re most vulnerable, and your pistol should be ready to fire at all times during that transition.
Tactical Priority: The Engagement Order Rule
Tactical Priority is another concept that sets IDPA apart from USPSA. In USPSA, you can engage targets in whatever order you want — left to right, right to left, skip around — whatever’s most efficient. In IDPA, you must follow the threat priority order.
The fundamental principle is “near to far”: when you see multiple targets from a position, you engage the closest threat first and work outward by distance. The reasoning is straightforward — in a real defensive encounter, the nearest attacker poses the greatest danger to you.
A secondary principle is “exposed targets take priority”: if a target is in the open (not behind cover), it ranks higher than a target that’s partially concealed behind a barrier. A threat standing in the middle of the road is more urgent than one hiding behind a doorframe.
Some stages specify Tactical Sequence instead of Tactical Priority, and these two are very different. Tactical Sequence requires you to fire one round on each target before returning for additional rounds. For example, facing three targets requiring two hits each, you’d shoot 1-1-1 (one on each), then 1-1-1 again (one more on each). This simulates the defensive concept of suppressing all threats quickly before confirming each one is neutralized.
Confusing Tactical Priority with Tactical Sequence is one of the most common ways new shooters pick up procedural penalties. During the stage briefing, listen carefully for which rule applies — and don’t be afraid to ask the Safety Officer to clarify.
Concealment Garment and Start Positions
IDPA requires all shooters to wear a concealment garment during competition — typically an unbuttoned vest or open-front jacket that covers your holstered pistol and all equipment. With your arms extended to your sides, your gun, holster, and magazine carriers must not be visible.
This requirement ties directly to IDPA’s core philosophy of simulating everyday concealed carry. In real life, you wouldn’t walk around with your gun and gear openly displayed, so the competition reflects that. It also means your draw time must include the motion of clearing the garment — a skill that requires dedicated practice to make smooth and fast.
Start positions in IDPA are more varied than in USPSA. Some stages have you seated in a chair, hands on a table, facing away from the targets, or even simulating driving a car when a threat appears. These varied scenarios are part of what makes IDPA feel like a series of short stories rather than an athletic event — “you’re sitting in a coffee shop when someone bursts through the door…” This scenario-driven design is one of the things that draws people to IDPA in the first place.
IDPA Penalties Explained
Understanding the penalty system helps you avoid giving away seconds for nothing. IDPA penalties come in several tiers.
A Procedural Error (PE) is the most common penalty, adding 3 seconds each time. PEs are triggered by improper use of cover, incorrect engagement order, reloading in the wrong location, or failing to follow stage-specific requirements (like shooting strong-hand-only when the stage calls for it). Three seconds might not sound like much, but in IDPA’s time-based scoring, a couple of PEs can drop you from the top third to the middle of the pack.
A Flagrant Penalty (FP) is a 10-second hit, reserved for situations where a shooter knowingly breaks a rule to gain a competitive advantage. Examples include shooting freestyle when strong-hand-only is required, or refusing to go prone when the stage calls for it. New shooters rarely need to worry about this one — it targets deliberate rule-bending, not honest mistakes.
Failure to Do Right (FTDR) is the harshest penalty at 20 seconds, aimed at extreme unsportsmanlike conduct or egregious intentional violations. You’ll almost never see this at a regular club match.
Hitting a non-threat target — the figure with open hands indicating an innocent bystander — adds 5 seconds per hit. Stage designers love placing non-threats right next to threat targets or partially obscuring threats behind non-threats, testing your target identification under pressure.
The most serious consequence is a DQ (Disqualification), which ends your entire match. DQs are reserved exclusively for safety violations: muzzle sweeping yourself or anyone else, dropping a loaded firearm, handling your gun outside the designated area, or an accidental discharge. The good news is that if you’ve had basic range safety training and maintain awareness of your muzzle direction, DQs are extremely rare.
Your First IDPA Match: What to Expect
Knowing the flow of match day can drastically reduce your pre-match jitters. Here’s what a typical IDPA club match looks like from start to finish.
Matches usually start at nine in the morning, but plan to arrive by eight. Registration involves some paperwork and selecting your division — if you’re unsure, the match staff will help you figure it out. New shooters typically get a dedicated briefing where an experienced shooter or Safety Officer walks you through the basics. Some clubs even assign a mentor who stays with you through the entire match.
A typical match consists of six stages, and you’ll be placed in a squad of 8-12 shooters who rotate through the stages together. At each stage, the Safety Officer conducts a walkthrough (Stage Briefing) explaining the start position, engagement order, target count, and any special requirements. This is your window to ask questions — no question is too basic, and no one will judge you for asking.
After the briefing, a shooting order is established. New shooters are usually placed near the end of the order so they can watch experienced competitors first, picking up on movement patterns, cover techniques, and stage strategy. When it’s your turn, the Safety Officer guides you to the start position, confirms you’re ready, and gives the start command.
After you finish shooting, you walk down range with the Safety Officer to score your targets. The scorekeeper records your results, you review and initial the score sheet, then clear out so the next shooter can go. The full match usually wraps up by early afternoon.
Five Common Mistakes New Shooters Make
After talking to dozens of IDPA shooters over the years, these are the mistakes that trip up newcomers most consistently. Knowing them ahead of time can save you plenty of penalty seconds.
The first is breaking cover. You think you’re tucked in tight, but your shoulder or foot is sticking out past the barrier. The fix is simple: during practice, have a friend stand where the Safety Officer would be and call out when you’re exposed. If you can’t do that, set up a phone to record your practice from behind. When in doubt, take an extra half-step back behind cover.
The second is getting the engagement order wrong. When you see three or more targets at once, it’s easy to lose track of which is closest under pressure. During the stage walkthrough, mentally rehearse the engagement sequence three times, and even point with your finger to lock in the 1-2-3 order.
The third is reloading at the wrong time. In IDPA, reloads should happen behind cover. Many newcomers finish shooting from one position and reload while walking to the next cover point — that’s a perfectly valid USPSA strategy, but in IDPA it earns you a procedural penalty.
The fourth is fumbling the concealment garment. When your cover garment snags during the draw, don’t panic. Sweep it cleanly with your support hand while your strong hand finds the grip. This two-hand coordination takes practice to become fluid — dry fire it hundreds of times before your first match.
The fifth is shooting non-threat targets. Under pressure, it’s tempting to fire at anything shaped like a person. Build the habit of spending a fraction of a second confirming each target before pulling the trigger — look for the threat indicator (hands holding a weapon) versus the non-threat indicator (open hands).
Practicing IDPA Skills at Home with a Shot Timer
Match performance is roughly 80% training and 20% match-day execution. The good news is that most core IDPA skills can be refined through dry fire practice at home.
Draw practice is the most fundamental drill. Use the AirsoftShotTimer app to set a buzzer-to-first-shot timer and track your draw speed over time. Since IDPA draws include clearing your concealment garment, always practice wearing the same jacket or vest you’ll compete in. A clean, consistent draw from concealment is worth more than any other single skill in IDPA.
Cover shooting movement can be practiced at any hallway corner. Work on stepping out from the edge of cover with minimal exposure, firing, and stepping back. Practice both left and right sides — you’ll encounter both in competition, and your weak side will be noticeably slower unless you train it.
Magazine changes are another area where focused practice pays huge dividends. Check out our Magazine Reload Techniques guide, and use a shot timer to measure each reload. The goal is to get your reloads under two seconds consistently.
For a more structured training program, see our IDPA Defensive Shooting Training Guide and Dry Fire Training Complete Guide.
Further Reading
- IDPA Divisions Explained — All 8 divisions with rules and recommended pistols
- IDPA vs USPSA Complete Comparison — Side-by-side analysis of both organizations
- IDPA Beginner Pistol Guide — How to choose your first competition pistol
- IDPA Defensive Shooting Training Guide — Complete IDPA training program
- Practical Shooting Beginner’s Guide — Fundamentals of competitive shooting
- Magazine Reload Techniques — Training methods to speed up your reloads
- IDPA
- IDPA Rules
- Defensive Shooting
- Competitive Shooting
- Vickers Count
- Tactical Priority
- IDPA Penalties
- Shot Timer
- IDPA Scoring
- IDPA Match