Complete Guide to Pistol Trigger Control: From Pre-Staging to Break
Why Is Trigger Control the Final Mile in Shooting?
Trigger control is the final mile in achieving accurate hits. Even if your stance is perfect, your grip is stable, and your aim is precise, if the muzzle moves during the trigger press, the bullet will miss its target—all your effort wasted.
Research shows that if the muzzle moves just 1/16 inch (about 1.5mm) before the shot breaks, it translates to approximately 4.5 inches of deviation at 20 feet. Double that movement to 1/8 inch (about 3mm), and the miss becomes 9 inches at the same distance. This is why trigger control is so critical.
The core objective of trigger control is simple: fire the gun without disturbing your aim. It sounds easy, but mastering it requires extensive practice and proper technique.
“Stance keeps you stable, aiming gets you on target, but trigger control determines where the bullet actually lands.”
The Nine Trigger Positions
To master trigger control, you must first understand the mechanics of trigger movement. Modern pistol triggers can be divided into nine positions:
1. Rest
The position when the trigger is fully relaxed and your finger hasn’t touched it yet.
2. Slack (Take-up)
The initial phase when your finger lightly touches the trigger and begins moving it rearward. This phase has almost no resistance—the trigger moves easily.
3. Wall
The first significant resistance point encountered after the slack is taken up. The trigger now requires more force to continue moving. This is where pre-staging ends.
4. Creep
The travel between the wall and the break. Some triggers have almost no creep (called a “clean break”), while others have noticeable creep.
5. Break
The moment the trigger releases the hammer or striker—when the gun fires. This is the critical moment in trigger control.
6. Overtravel
The distance the trigger continues to move rearward after the break.
7. Pin
The final position when the trigger is fully pressed to the rear.
8. Reverse Travel
When you relax pressure, the trigger begins moving forward.
9. Reset
The point where the trigger moves forward enough to re-engage the firing mechanism, producing an audible “click.” This is the starting point for follow-up shots.
Why Understanding Trigger Positions Matters
- Pre-staging: Stopping the trigger at the “wall” position reduces the distance needed to reach the break
- Reset control: Releasing only to the reset point reduces trigger travel for the next shot
- Tactile memory: Familiarity with your pistol’s trigger characteristics builds muscle memory
Proper Trigger Technique
Finger Placement: Finding the Sweet Spot
The most critical first step in trigger control is correct finger placement.
The Ideal Contact Point
For semi-automatic pistols, the ideal contact point is the center of the pad on your first finger joint (the fingertip pad). This is the most sensitive area of your finger, providing the best tactile feedback.
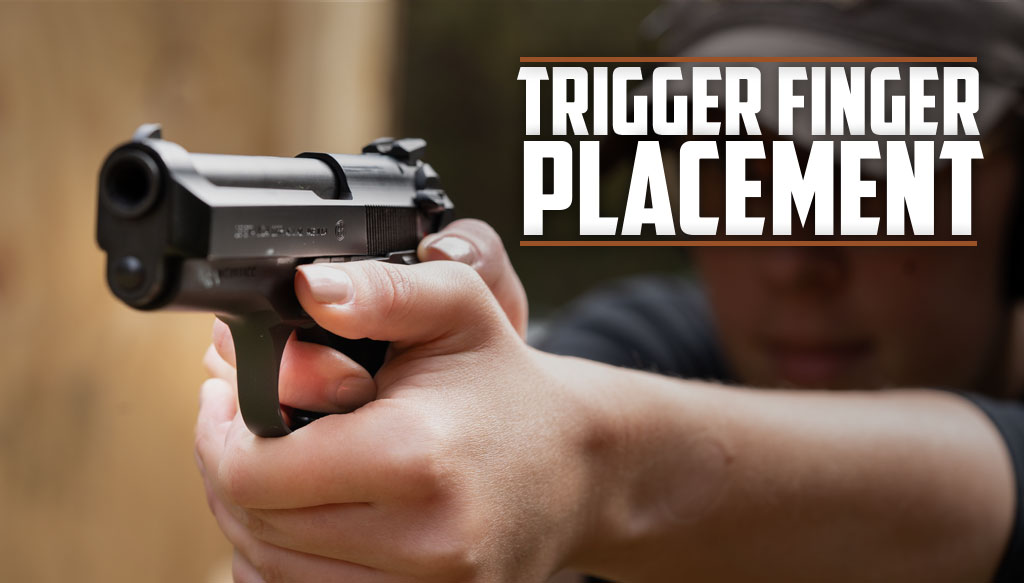
The contact point should be just forward of the distal finger crease. Avoid using the fingertip because:
- The tip has less flesh, making it prone to slippage
- Tactile feedback is weaker
- Force direction is inconsistent
Diagnosing Left/Right Deviation
Incorrect finger placement causes point of impact to shift:
| Shooter | Too Much Finger (Too Deep) | Too Little Finger (Too Shallow) |
|---|---|---|
| Right-handed | Shots go right | Shots go left |
| Left-handed | Shots go left | Shots go right |
Mechanical Isolation: Move Only the Trigger Finger
Mechanical isolation is the core principle of trigger control: when pressing the trigger, only your trigger finger moves, while the rest of your hand remains still.
This sounds simple, but many shooters unconsciously:
- Squeeze their entire hand when pressing the trigger
- Tighten other fingers along with the trigger finger
- Create small wrist movements
These small movements cause the muzzle to shift.
How to Practice Mechanical Isolation
-
Bare-hand practice
- Make a fist, extending only your index finger
- Repeatedly bend your index finger while keeping other fingers completely still
- Practice for 2-3 minutes daily
-
Dry fire with grip
- Grip the pistol correctly, focus on moving only the trigger finger
- Observe whether the sights move during the trigger press
- If sights move, other parts are moving too
-
Coin test
- Place a coin on the slide
- Dry fire
- If the coin falls, the gun moved during the trigger press
Straight Rearward Press: Direction of Force
When pressing the trigger, force should be straight rearward along the bore axis, not downward or sideways.
Incorrect force direction causes:
- Pulling down → Shots go low
- Pulling left → Shots go left (right-handed)
- Pulling right → Shots go right (right-handed)
Practice method:
- Imagine pressing a button located directly behind the barrel
- The trigger’s path should be parallel to the barrel
- Use a laser training device to observe movement during trigger press
Pre-Staging Technique
What Is Pre-Staging?
Pre-staging (Pre-press) means taking up the slack and stopping at the “wall” position while preparing to shoot, then completing the final break only after confirming your sight picture.
Benefits of Pre-Staging
-
Reduced break travel
- The distance from wall to break is minimal
- Less opportunity for movement during the press
-
Increased shooting speed
- Only a short trigger movement after sight confirmation
- Ideal for IPSC competition
-
Improved consistency
- Starting from the same point every time
- Building reliable tactile memory
How to Execute Pre-Staging
-
Raise and aim: Complete your draw and sight acquisition
-
Take up the slack: Touch the trigger and lightly press rearward
-
Stop at the wall: Pause when you feel the first resistance
-
Confirm sight picture: Verify sight alignment and proper sight picture
-
Complete the break: Smoothly increase pressure until the shot breaks
Pre-Staging Considerations
- Don’t stay at the wall too long: Muscles will fatigue and shake
- Ensure safety: Only pre-stage when you’ve decided to shoot
- Learn the feel: Every gun’s wall position is different
Break and Follow-Through
The Perfect Break
The break is the most critical moment in trigger control. The ideal break should be:
-
A “Surprise”
- The break should have an element of unexpectedness
- This indicates you’re not anticipating recoil
- If you can predict exactly when the break occurs, you may be “jerking” the trigger
-
Smooth pressure increase
- Force should increase steadily and continuously
- No sudden acceleration or deceleration
- Imagine pressing a button that slowly gives way
-
Maintain sight picture
- Your eyes should be on the front sight at the moment of break
- Confirm the sight position when the shot breaks
- This is key to calling your shots
Follow-Through
Follow-through is maintaining your shooting position and sight picture after the shot. Many shooters neglect this.
Why Is Follow-Through Important?
-
Shot confirmation
- Observe where the sights were at the moment of firing
- Determine if a follow-up shot is needed
-
Maintain consistency
- Build the habit of completing the full shooting cycle
- Avoid relaxing immediately after firing
-
Prepare for the next shot
- Assess target status
- Decide whether to continue shooting or transition
Proper Follow-Through
- Maintain shooting position for 0.5-1 second after firing
- Keep eyes focused on the target area
- Keep the trigger pressed to the rear, don’t release immediately
- Assess the hit before taking the next action
Trigger Reset Technique
What Is Trigger Reset?
Trigger reset is releasing the trigger just far enough forward for the firing mechanism to re-engage, preparing for the next shot.
The Importance of Reset
-
Reduced trigger travel
- No need to fully release to the rest position
- Next shot starts from the reset point
-
Faster follow-up shots
- Less finger movement distance
- Shorter split times
-
Maintained control
- Finger stays on the trigger
- No time lost finding the trigger again
How to Execute Reset
-
Hold trigger to the rear after firing: Don’t release immediately
-
Slowly release the trigger: Relax your finger forward while maintaining contact
-
Listen/feel for reset: Stop when you hear a “click” or feel the engagement
-
Start next shot from reset: No need to fully release
Reset Point Variations
Different pistols have vastly different reset points:
| Pistol Type | Reset Characteristics |
|---|---|
| Glock | Reset near break point, short travel |
| 1911 | Very short reset, extremely fast |
| CZ Shadow 2 | Distinct reset, clear tactile feedback |
| DA/SA pistols | SA mode has short reset, DA mode has long reset |
The “Riding the Reset” Debate
Some instructors advocate “riding the reset”—keeping the trigger at the reset point at all times. But there are different opinions:
For riding the reset:
- Shortest possible trigger travel
- Fastest follow-up shots
- Precise tactile control
Against riding the reset:
- May miss the reset point (especially when using different guns)
- Difficult to execute under stress
- May cause “trigger freeze”
Recommendation: Beginners should focus on basic trigger control first, then practice riding the reset once proficient.
Trigger Control for Different Action Types
Striker-Fired
Common in: Glock, SIG P320, S&W M&P, Springfield XD
Characteristics:
- Consistent trigger pull
- Medium pull weight (approximately 5.5-6.5 lbs)
- Same feel for every shot
Control points:
- Learn the slack and wall positions
- Practice consistent pre-staging and break
- Reset is typically short
Single Action (SA)
Common in: 1911, CZ competition pistols in SA mode
Characteristics:
- Very short trigger travel
- Light pull weight (approximately 2-4.5 lbs)
- Crisp break
Control points:
- Be careful of accidental discharge (very light pull)
- Requires more refined finger control
- Excellent for precision shooting
Double Action (DA)
Common in: Beretta 92, SIG P226 (traditional), revolvers
Characteristics:
- Long trigger pull
- Heavy pull weight (approximately 9-12 lbs)
- Trigger also cocks the hammer
Control points:
- Requires stronger finger strength
- Practice smoothly pressing through the entire stroke
- Use the distal crease position for more leverage
- Keep grip stable—don’t let pull weight affect it
Double Action/Single Action (DA/SA)
Common in: Beretta 92FS, CZ 75, SIG P226
Characteristics:
- First shot DA (long/heavy), subsequent shots SA (short/light)
- Must adapt to two trigger characteristics
- First-shot extra safety
Control points:
- Must practice the DA first shot: Many shooters only practice SA
- Build transition technique: Smooth DA to SA transition
- Start every training session with DA: Simulate real-world use
- Practice the “press-out” technique: Begin DA trigger press during the drawstroke
Related reading: Beretta 92FS Complete Guide - Learn classic DA/SA pistol operation
Common Trigger Control Errors
Error 1: Anticipation / Flinch
This is the most common and most difficult trigger control problem to overcome.
Symptoms
- Unconsciously pushing down on the gun at the moment of trigger press
- Anticipating recoil before it happens
- Shots consistently low (right-handed shooters often hit low-left)
Why Does It Happen?
- Brain anticipates the explosion and recoil impact
- Subconsciously trying to “control” the coming force
- More nervous = more likely to flinch
Diagnostic Method: Ball and Dummy Drill
This is the gold standard for diagnosing anticipation:
- Have a friend load your magazine
- Randomly mix in dummy rounds (snap caps)
- Shoot normally
- Observe whether the muzzle dips when you encounter a dummy
If the muzzle clearly dips, you have an anticipation problem.
Correction Methods
-
Extensive dry fire practice
- 50-100 repetitions daily
- Focus on keeping sights still during trigger press
- Cultivate the “surprise break” feeling
-
Coin/dime drill
- Place a coin on the slide
- Coin shouldn’t fall during dry fire
- Verifies gun stability
-
Start with small caliber
- Build confidence with .22
- Gradually transition to larger calibers
- Reduce fear of recoil
-
Focus on front sight
- 50% attention on front sight
- 50% attention on trigger feel
- Let the break be a “surprise”
Related reading: Complete Dry Fire Training Guide - Eliminate anticipation at home
Error 2: Jerking / Slapping the Trigger
Symptoms
- Sudden, rapid trigger press
- No smooth increase in pressure
- Break moment is predictable
Problems
- Trigger movement moves the entire gun
- Large, unpredictable shot dispersion
- Difficult to build consistency
Correction Methods
- Practice slow, smooth trigger press
- Focus on “squeezing” rather than “pulling”
- Use counting method: count “1, 2, 3…” while slowly increasing pressure
Error 3: Inconsistent Finger Placement
Symptoms
- Finger contacts trigger in different positions each time
- Sometimes too deep, sometimes too shallow
- Shots go left and right inconsistently
Problems
- Cannot build stable muscle memory
- Inconsistent force direction
- Difficult to analyze and correct other problems
Correction Methods
- Verify finger placement during dry fire
- Establish a consistent grip and finger placement procedure
- Use a mirror to check finger position
Error 4: Ignoring Reset
Symptoms
- Fully releasing trigger after each shot
- Finding the trigger again, starting the entire stroke over
- Slow follow-up shots
Problems
- Wasted trigger travel
- Reduced shooting efficiency
- Finger may slip off trigger
Correction Methods
- Practice feeling the reset point
- Release only to reset, not fully
- Listen for the “click” to confirm reset
Error 5: Unstable Grip Pressure
Symptoms
- Changing grip pressure during trigger press
- Index finger movement causes other fingers to move
- Grip pressure fluctuates
Problems
- Gun moves in hand
- Aim changes during shooting
- Inconsistent recoil control
Correction Methods
- Practice mechanical isolation
- Establish stable, consistent grip pressure
- “Firm but not rigid”
Trigger Control Training Plan
Beginner (Weeks 1-4)
Daily training: 15-20 minutes
| Exercise | Time | Focus |
|---|---|---|
| Bare-hand finger isolation | 3 min | Move only index finger, other fingers still |
| Basic dry fire | 5 min | Focus on sights not moving |
| Coin test | 5 min | Verify gun stability |
| Trigger position awareness | 5 min | Feel slack, wall, break |
Weekly goals:
- Week 1: Familiarize with trigger positions
- Week 2: Establish stable finger placement
- Week 3: Practice mechanical isolation
- Week 4: Begin pre-staging practice
Intermediate (Weeks 5-12)
Daily training: 20-30 minutes
| Exercise | Time | Focus |
|---|---|---|
| Dry fire + pre-staging | 10 min | Pre-stage to wall, complete break |
| Reset practice | 5 min | Feel reset point, practice riding reset |
| Ball and Dummy | 10 min | Diagnose anticipation |
| Continuous fire rhythm | 5 min | Record split times with Shot Timer |
Using AirsoftShotTimer:
- Record split times
- Beginner target: Under 0.4 seconds
- Intermediate target: Under 0.25 seconds
Advanced (Week 13 onward)
Daily training: 30-45 minutes
| Exercise | Time | Focus |
|---|---|---|
| Speed shooting | 15 min | Complete multiple shots within PAR time |
| Distance adaptation | 10 min | Adjust trigger control precision for different distances |
| Stress training | 10 min | Maintain trigger control after physical exertion |
| Different trigger types | 10 min | Practice transitioning between SA, DA, striker-fired |
Advanced targets:
- Split times: Under 0.18 seconds
- Maintain 95%+ A-zone hit rate
- Maintain trigger control quality under stress
FAQ
Q1: What’s the difference between trigger control and trigger discipline?
A:
- Trigger discipline: A safety rule meaning your finger should be outside the trigger guard when not ready to shoot
- Trigger control: A shooting technique for properly pressing the trigger to achieve accurate shots
Both are important but belong to different domains.
Q2: Should I “squeeze” or “pull” the trigger?
A: This is a semantic issue. Some instructors believe:
- “Squeeze” might mislead shooters into tightening the entire grip
- “Pull” more accurately describes rearward trigger movement
- “Press” emphasizes continuous rearward pressure
The key is results: Whatever term you use, as long as you can fire without disturbing your aim, it’s correct technique.
Q3: I always shoot low. Is it a trigger control problem?
A: Most likely it’s anticipation. This is the most common trigger control problem.
Diagnostic method:
- Use the Ball and Dummy drill
- Observe if the muzzle dips when you hit a dummy
- If there’s obvious dipping, it’s anticipation
Correction methods:
- Extensive dry fire practice
- Start with small caliber
- Focus on the “surprise break”
Q4: What is “surprise break”?
A: “Surprise break” means when pressing the trigger, the moment it breaks carries a sense of being somewhat “unexpected.”
This sounds contradictory but prevents anticipation:
- If you can precisely predict when the break occurs, you may be “waiting for” or “creating” that moment
- This waiting causes unconscious body reactions (like pushing down)
- “Surprise break” means you’re focused on steadily increasing pressure, not predicting the break
Note: For advanced competitive shooters, “surprise break” no longer applies as they need precise control of every shot’s timing.
Q5: How fast should I press the trigger?
A: It depends on target and distance:
- Long range/small target: Slow, precise trigger control
- Close range/large target: Fast but still controlled trigger press
- IPSC competition: “Fast enough but not too fast”—achieve required accuracy at maximum speed
Principle: Better to be slightly slower and hit the A-zone than too fast and miss.
Q6: How do I practice trigger control with DA/SA pistols?
A: The key is you must practice the DA first shot:
-
Start every training session with DA
- After loading, manually decock
- Start shooting from empty chamber DA
-
Practice the “press-out” technique
- Begin DA trigger press during drawstroke
- Complete most of DA travel by the time gun reaches extension
-
Decock after every string
- Don’t shoot entire magazines in SA only
- Force yourself to learn the DA to SA transition
Conclusion
Trigger control is the final piece of the accuracy puzzle. If your stance, grip, and aim are correct but something goes wrong at the moment of trigger press, everything is wasted.
Key Takeaways
- Understand the nine trigger positions, especially wall, break, and reset
- Correct finger placement is on the pad of the first finger joint
- Mechanical isolation: Move only the trigger finger, nothing else
- Pre-staging reduces break travel and increases speed
- Anticipation is the most common problem—overcome it with dry fire and Ball and Dummy drills
- Use AirsoftShotTimer to record split times and quantify progress
Next Steps
- Verify your finger placement is correct
- Conduct the coin test to verify gun stability
- Practice dry fire for 15-30 minutes daily
- Use Ball and Dummy to diagnose anticipation
- Record split times with a Shot Timer
Stance + Aiming + Trigger Control = Accurate Hits!
Happy training!
Related Articles
Shooting Fundamentals Trilogy
- Shooting Stance Complete Guide - Foundation of stable shooting
- Pistol Aiming Complete Guide - Accurate target acquisition
- Dry Fire Training Complete Guide - Practice trigger control at home
Training Tools
- Shot Timer Complete Guide - Track progress with data
- Magazine Reload Techniques Guide - Master reload techniques
Competition Shooting
- IPSC Practical Shooting Complete Training Guide - Core competition techniques
- IDPA Defensive Shooting Complete Training Guide - Tactical-oriented training
- IPSC Production Optics Beginner Guide - Red dot sight competition use
Pistol Guides
- Glock 17 Training Guide - Classic striker-fired pistol
- Beretta 92FS Complete Guide - DA/SA pistol training
- CZ Shadow 2 Complete Guide - Top choice for competition
- 1911 Complete Guide - Classic single-action pistol
Beginner Guides
- Airsoft Beginner Complete Guide - Start your Airsoft journey
- Trigger Control
- Pre-Staging
- Break
- Shooting Training
- IPSC
- IDPA
- Pistol Training
- Dry Fire Practice
- Anticipation