Best FAST Helmet 2026: Top 5 Airsoft Picks + MICH Comparison & Setup Guide ($15-$300)
The Most Underrated Piece of Airsoft Gear
Quick Answer for Beginners: Buy a FAST PJ helmet ($25-50 mid-range). FAST is the right choice for 90% of airsoft players because it’s lighter (600-750g), runs tactical headsets cleanly, and ventilates better than MICH. The complete setup process takes about 15 minutes — fit the shell, integrate it with your goggles, mount a GoPro, then add headset adapters if you play with a team. A full step-by-step setup walkthrough is in the Your First Helmet Build section below.
Short answer if you’re comparing: FAST helmets are lighter, cooler, and compatible with tactical headsets — pick one unless you specifically want maximum head coverage, in which case go MICH. But the real question isn’t which type; it’s how to set one up properly so it actually works for you on game day.
When you first get into airsoft, most of your budget goes toward the gun — upgrading the inner barrel, swapping the motor, picking out optics. It feels like accuracy is everything. But after a few games, you discover something nobody warns you about: a BB hitting your unprotected scalp is a special kind of pain. It’s sharper and more startling than a hit on your arm or chest, especially in CQB environments where engagement distances are short and the volume of fire is high. You get tagged on the head far more often than you’d expect.
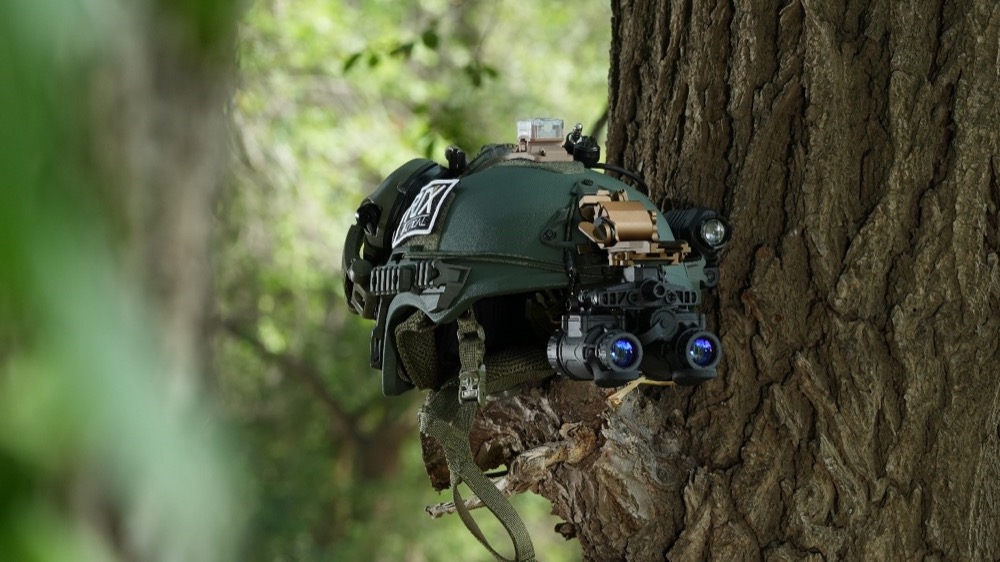
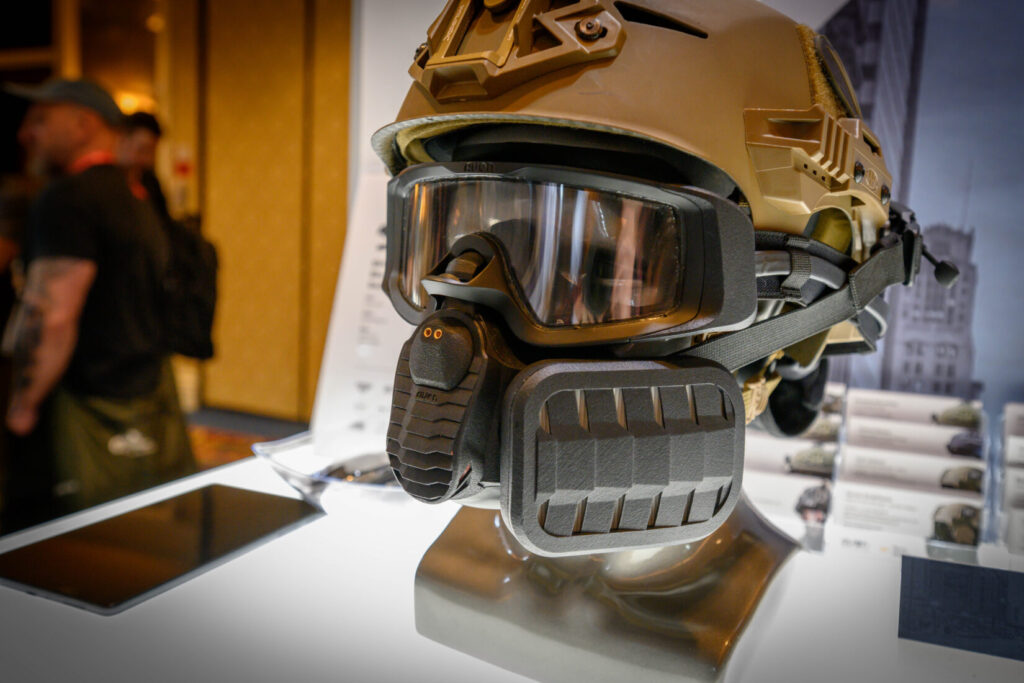
Beyond just stopping that sting, helmets in modern airsoft have evolved into full-fledged equipment platforms. The NVG mount on the front lets you attach a GoPro or tactical flashlight. Side rails accept headset adapters, IR markers, and accessory clips. Helmet covers match your camo pattern and add hook-and-loop surfaces for patches. A good helmet integrates protection, functionality, and aesthetics into one piece of gear — it’s something every serious player eventually picks up.
The problem is that there are too many choices. FAST, MICH, PJ, BJ, MH — the abbreviations alone are enough to make your head spin. Don’t worry. This guide walks you through helmet types, variant differences, accessory setups, and brand recommendations so you can make a confident decision.
FAST vs MICH: The Real Difference (Quick Answer)
What’s the real difference between a FAST helmet and a MICH helmet? A FAST helmet is a high-cut design that exposes the ears so you can run over-ear headsets and hearing protection, weighs 600-750g, and ventilates better in hot weather — it’s built for modern tactical mobility. A MICH helmet is a mid-cut design that covers the ears and lower skull for more complete head protection, weighs 750-900g, and fits closer to traditional military silhouettes — it’s built for maximum coverage.
For airsoft, roughly 90% of players go FAST because the headset compatibility and weight savings matter far more than the extra coverage. Pick MICH only if you already own a bucket-style helmet you love, you play heavy woodland where side branches are a constant hazard, or you specifically want the classic ACH/MICH 2000 silhouette for a loadout build.
Three Main Helmet Types: FAST, MICH, and Traditional
The tactical helmet market for airsoft breaks down into three broad categories, each with a clear design philosophy and intended use case. Understanding the differences is the first step toward choosing the right one.
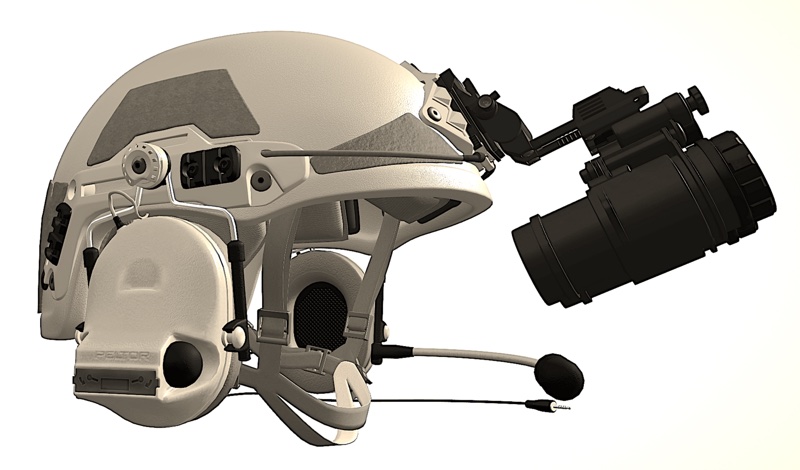
FAST Helmet — The Modern Standard
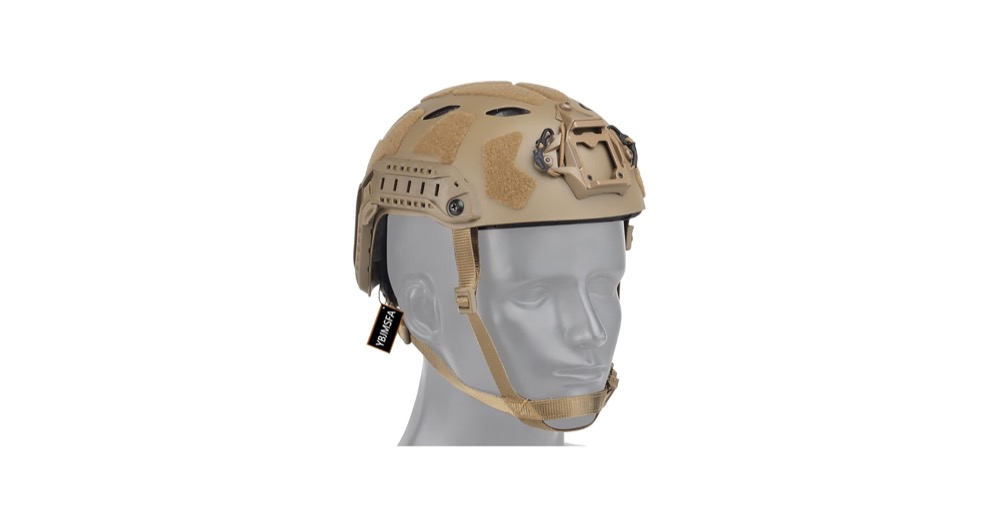
FAST stands for Future Assault Shell Technology, originally developed by Ops-Core for U.S. special operations forces. Its most distinctive feature is the high-cut design — the edges around the ears are aggressively trimmed back to leave room for communication headsets or over-ear hearing protection. If you’ve seen any photos or footage of modern special forces operators, the helmet on their heads is almost certainly a FAST-style design.
The first time you pick up a FAST helmet, you’ll be surprised by how light it is. Airsoft replicas typically weigh between 600 and 800 grams, which is considerably less than most people expect. The ABS shell feels solid without being bulky, and the internal EPP foam pads provide cushioning and comfort. A dial adjustment system at the back lets you quickly dial in the right fit for your head circumference. Once it’s on, the weight distributes evenly across the crown and occipital area — there’s no single pressure point that becomes uncomfortable over time.
What makes the FAST helmet dominant in airsoft is its unmatched expandability. The front NVG shroud accepts cameras and lights, the side rails support a wide range of accessories, and hook-and-loop surfaces let you customize the look with patches and identifiers. It’s a platform, not just a shell.
MICH Helmet — The Classic Mid-Cut
MICH stands for Modular Integrated Communications Helmet, based on the U.S. military’s standard-issue combat helmet design. Compared to the FAST, the MICH’s key difference is its cut height — it provides significantly more coverage around the ears and extends lower at the back of the head. This means better overall protection, but at the cost of reduced ventilation and headset compatibility.
The MICH is ideal for players who don’t need to mount headsets and want maximum head coverage. In outdoor woodland fields, the extra coverage provides real protection when you’re pushing through brush and ducking under low obstacles. The look is also more classic military — if you’re going for a Black Hawk Down or Iraq War-era aesthetic, a MICH fits that vibe better than a FAST.
The downside is heat. Because the MICH covers more area and typically has smaller or no ventilation holes in the crown, hot air gets trapped inside. If you play primarily in warm or tropical climates, this is worth serious consideration — the difference in comfort over a full game day is noticeable.
Traditional Helmets and Half-Shells
Beyond FAST and MICH, you’ll find traditional-style helmets like M1 steel helmet replicas or M88 designs. These typically lack any accessory compatibility — no rails, no NVG mount, just a basic protective shell. They’re suited for themed MilSim events like World War II reenactments, or players on extremely tight budgets. For most people, a FAST or MICH is the more practical choice.
FAST Helmet Variants: PJ, BJ, and MH Explained
The FAST helmet comes in three main variants, and the differences center on ventilation design and rail configuration. Many beginners agonize over this choice, but the practical differences are smaller than you might think.
The PJ variant (Parachute Jumper) has the largest ventilation openings — several large holes cut directly into the crown of the shell. The benefit is excellent heat dissipation, since the top of your head is where the most body heat concentrates. The tradeoff is slightly less shell coverage, though the odds of a BB threading through a vent hole during a game are practically zero. The PJ is the best choice for hot weather and the most popular variant overall.
The BJ variant (Base Jump) has smaller ventilation holes and a more complete shell profile. If the large openings on the PJ bother you aesthetically or you want marginally more coverage, the BJ is a solid middle ground. The real-world temperature difference between PJ and BJ is maybe one or two degrees — noticeable but not decisive.
The MH variant (Maritime Helmet) features an extended side rail system that provides more mounting space along the sides. This is particularly useful if you need to mount multiple accessories simultaneously, such as a headset adapter on one side and an IR marker on the other. If you’re planning a fully loaded setup, the MH’s extra rail real estate is worth having.
For most players, the PJ is the safest entry point. If you’re stuck choosing, go with PJ — you won’t regret it.
Helmet Accessories: From Basic to Advanced
A good helmet is just the starting point — the accessories are what unlock its full potential. Here are the most common and useful helmet add-ons, listed roughly in order of priority.
NVG Mount and Camera Attachment
The NVG (Night Vision Goggle) shroud on the front of the helmet is the most frequently used accessory interface. While most airsoft players never mount actual night vision, the shroud is a perfect spot for a GoPro or other action camera. With an inexpensive NVG-to-GoPro adapter — usually under ten dollars — you get a first-person perspective that captures every game. For many players, wanting to film gameplay is what finally pushes them to buy a helmet.
For night games, the NVG mount also works for tactical flashlight brackets and headlamp holders, keeping your hands free to control your weapon while maintaining illumination.
Side Rail Accessories
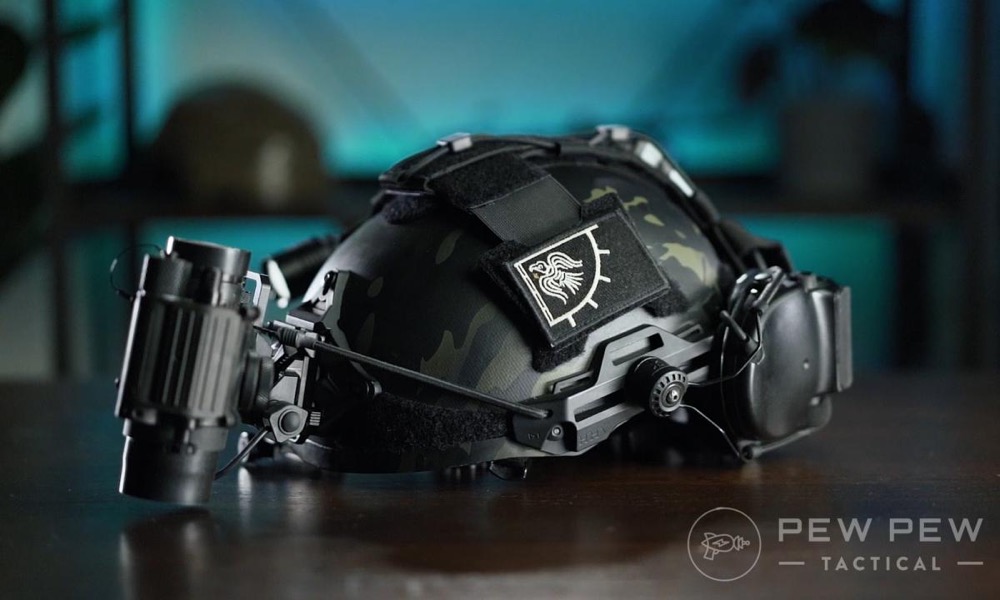
The side rail system supports a variety of attachments. The most popular use is mounting tactical headset adapters — specifically, ARC rail brackets that let you hang Comtac replicas, Earmor M31/M32 headsets, or similar ear protection directly from the helmet rails instead of using a separate headband. This isn’t just about looks — it’s genuinely more comfortable because the headset weight is borne by the helmet rather than squeezing your ears.
If you’re running a budget setup with Howard Leight Impact Sport electronic earmuffs, compatible ARC rail adapters are available that let you mount them to a FAST helmet. It’s the most affordable way to achieve a helmet-integrated headset configuration.
Other common rail accessories include IR markers for night game IFF (Identification Friend or Foe), side-mounted flashlight clips, and additional hook-and-loop panels.
Helmet Covers and Camouflage
Helmet covers are the fastest way to change your helmet’s appearance. Available in every conceivable camo pattern — Multicam, Ranger Green, AOR1, M81 Woodland — swapping a cover is like getting a brand-new helmet. Most covers include additional hook-and-loop panels and elastic cords where you can tuck in vegetation or scrim netting for enhanced concealment in woodland environments.
Choosing by Playstyle: CQB, MilSim, or Speedsoft
Different game formats have very different helmet requirements. Rather than chasing the “best” helmet, pick the one that best fits how you actually play.
If you mainly play CQB indoors, your head is the most exposed target — helmets are practically essential gear. A FAST PJ is the ideal choice: lightweight, well-ventilated, and slim enough that you won’t catch it on doorframes in tight corridors. Indoor games typically don’t demand heavy accessory setups, so a basic FAST paired with your goggles is plenty. The key detail to get right is ensuring there’s no gap between the helmet’s front edge and the top of your goggles — BBs have a way of finding gaps at close range.
MilSim players have the highest demands. Beyond basic protection, you may need camera mounts, tactical headsets, IR markers, and potentially real night vision for after-dark operations. A FAST MH or high-quality FAST PJ with full accessories is the standard MilSim loadout. A helmet cover is also standard issue for MilSim, because camo integration directly affects your concealment effectiveness.
Speedsoft is the opposite extreme. In a community built around maximum speed and minimum drag, many players skip the helmet entirely in favor of full-face masks like the Dye i4 or i5. If you insist on wearing a helmet, go with the lightest FAST PJ you can find and don’t mount any accessories. Keep your head as light and unencumbered as possible.
FAST Helmets Beyond Airsoft: Streamers, Cosplay & Content Creators
Here’s something the search data makes obvious: a lot of people typing “best FAST helmet 2026” or “best helmet for gamers” aren’t airsoft players at all. They’re streamers building a tactical-themed setup, cosplayers assembling a Call of Duty or Helldivers loadout, photographers staging a milsim shoot, or content creators who just want that operator silhouette on camera. If that’s you, good news — the affordable airsoft FAST replica is almost certainly the right buy, and anything pricier is money you’ll never get the benefit of.
First, clear up the confusion that sends so many of these searches sideways. Search “best FAST helmet 2026” and Google serves you a wall of genuine ballistic helmets — the Ops-Core FAST SF at around $1,999, the Team Wendy EXFIL, Galvion shells — NIJ IIIA rated to stop actual bullets. Those are magnificent pieces of kit and completely overkill if no one is shooting live rounds at you. For cosplay, streaming, photography, or airsoft, what you actually want is a non-ballistic bump replica: the same iconic high-cut shape, the same rails and NVG shroud for mounting, at a tenth of the cost. The only thing you give up is a ballistic rating you were never going to use.
For a streaming or on-camera build, prioritize the look and the mounting points over field durability. A clean Emerson or FMA FAST PJ in black or Ranger Green photographs beautifully, and the front NVG shroud doubles as a perfect anchor for a webcam, a small key light, or a dummy night-vision device for that authentic operator profile. Some creators deliberately run a rail-less or stripped shell for a cleaner silhouette on camera — if that’s the goal, you don’t need the extended MH rails; a basic PJ is lighter and looks tidier. Add a helmet cover in your stream’s accent color and a couple of morale patches, and you’ve got a recognizable, on-brand prop for a fraction of what a real ballistic shell costs.
Cosplayers have one extra consideration: matching the exact silhouette of the character or unit you’re portraying. Most modern military and game-inspired loadouts (Task Force 141, Helldivers, Ghost Recon) are built around the FAST high-cut shape, so a PJ or BJ replica gets you 90% of the way there. If your reference shows a chunkier, ear-covering profile — older Black Hawk Down or Iraq-era kits — a MICH 2000 replica is the better silhouette. Either way, you can paint, weather, and patch an airsoft shell freely without feeling like you’ve ruined an expensive helmet, which is exactly why replicas are the cosplay community’s default.
Brand Recommendations and Budget Tiers
Airsoft helmets range from roughly $10 to over $100, and quality varies significantly across that spectrum. Here are the brands worth considering at each price point.
At the entry level ($10-25), ATAIRSOFT and AOUTACC are the highest-volume sellers on Amazon. They offer basic ABS shells with adjustable fitting systems and standard rail interfaces. For a first-time buyer who isn’t sure whether a helmet is right for them, these get the job done. Build quality and accessory compatibility can be inconsistent though, so manage expectations.
The mid-range ($25-50) is where most dedicated players find their sweet spot. Emerson and FMA are the leading brands in this tier. Emerson’s higher-end products — particularly in the $35-50 range — are widely considered among the best FAST replicas available. Shell thickness, foam quality, and rail precision are all noticeably better than entry-level options. FMA offers a broader product range from budget to premium; when shopping FMA, look for their newer generation models.
OneTigris deserves a special mention. Originally known for their mesh face masks, they’ve expanded into helmets with strong results. Their MICH 2000 is well-regarded for its light weight, durability, and comfortable adjustment system at a reasonable price. If you want a MICH-style helmet, OneTigris is the first brand to check.
At the high end ($50+), players with generous budgets can look at DragonRed’s premium replicas, or go straight to an Ops-Core FAST Bump (the non-ballistic version). Genuine Ops-Core Bumps run $200-300 overseas — undeniably a luxury for airsoft — but the quality and comfort are in a completely different league.
Best FAST Helmet 2026: Quick Picks at a Glance
If you don’t have time to read the full breakdown, here’s the 2026 cheat sheet most players land on after their first season. Each FAST helmet pick is the consensus choice in its category, refined from forum recommendations, retailer best-sellers, and what shows up most often on field photos — with one MICH option included for woodland players who want maximum coverage.
- Best FAST Helmet Overall 2026 (Most Players Should Buy This): Emerson FAST PJ ($35-50) — the sweet spot of price, build quality, and accessory compatibility
- Best Budget FAST Helmet Under $25: ATAIRSOFT FAST PJ — a no-risk way to find out if helmets are for you
- Best FAST Helmet for Tactical Headsets: FMA FAST Maritime ($25-35) — extended side rails make ARC headset mounting easier
- Best for Woodland & MICH Lovers: OneTigris MICH 2000 ($20-30) — maximum coverage, classic ACH silhouette
- Best Premium FAST Helmet (Money No Object): Ops-Core FAST Bump ($200-300) — the genuine article, lasts forever
- Best FAST Helmet for Hot Climates: Any FAST PJ variant — the large vent holes make a real comfort difference
- Best for Speedsoft: Skip the helmet entirely; use a Dye i4/i5 full-face mask instead
For most players reading this for the first time in 2026, the Emerson FAST PJ is the right answer. It’s the FAST helmet that experienced players consistently recommend when newcomers ask, and it gives you genuine quality without paying premium-replica prices.
Top 5 Airsoft Helmets Worth Buying
With dozens of helmets flooding Amazon and Evike, it helps to narrow the field. Here are the same five picks above with the full reasoning behind each choice — each one tested by the airsoft community and consistently recommended in forums and reviews.
1. ATAIRSOFT FAST PJ — Best Budget Entry ($15-20) This is the helmet most beginners end up buying, and honestly, it’s hard to argue with the value. The ABS shell is thinner than mid-range options, but it handles BB impacts without complaint. The dial adjustment works, the NVG shroud and side rails accept standard accessories, and it comes in a dozen colors. If you’re not sure whether helmets are for you, this is the risk-free way to find out. Just don’t expect the foam pads to last more than a season.
2. FMA FAST Maritime — Best Mid-Range All-Rounder ($25-35) FMA’s newer-generation Maritime helmet punches well above its price. The shell feels noticeably thicker than budget options, the internal padding uses a proper suspension system rather than just glued foam, and the extended side rails give you plenty of room for headset adapters and accessories. The Maritime cut also works better with tactical headsets than a standard PJ. If you’re planning to build a full helmet setup with headset, camera, and cover, the FMA Maritime gives you a solid foundation without burning your budget.
3. Emerson FAST PJ — Best Premium Replica ($35-50) Emerson’s higher-end FAST helmets are what most experienced players recommend when someone asks “what helmet should I get?” The fit, finish, and accessory compatibility are consistently a step above FMA and ATAIRSOFT. The shell thickness and EPP foam density feel closer to real-steel bump helmets than airsoft replicas. The dial adjustment is smooth, the chin strap doesn’t loosen during gameplay, and accessories click into the rails without wobble. It’s the sweet spot where you’re paying for genuine quality improvements, not just branding.
4. OneTigris MICH 2000 — Best MICH Option ($20-30) If you want the classic military look with maximum head coverage, the OneTigris MICH is the community favorite. It’s lighter than most MICH replicas, the velcro adjustment pads inside are high quality, and it fits a wider range of head sizes than many FAST helmets. The downside is less accessory compatibility — you get a front NVG shroud but no side rails, so headset mounting isn’t an option. For woodland games where you want protection over modularity, it’s an excellent choice.
5. Ops-Core FAST Bump — Best Money-Can-Buy ($200-300) This is the real deal — the non-ballistic version of the helmet that started the FAST revolution. The Ops-Core Bump uses a carbon fiber and polymer shell that feels impossibly light for its strength. The Occ-Dial liner system is the most comfortable adjustment mechanism you’ll ever use, and every accessory made for FAST helmets was designed with Ops-Core dimensions in mind. Is it overkill for airsoft? Absolutely. But if you play three or four times a month and you want something that will last years without compromise, it’s the ultimate investment.
How to Size Your Helmet
Getting the right helmet size is simpler than most people think, but it makes a huge difference in comfort and stability. A helmet that’s too loose will bounce around when you run; one that’s too tight will give you a headache before the first game ends.
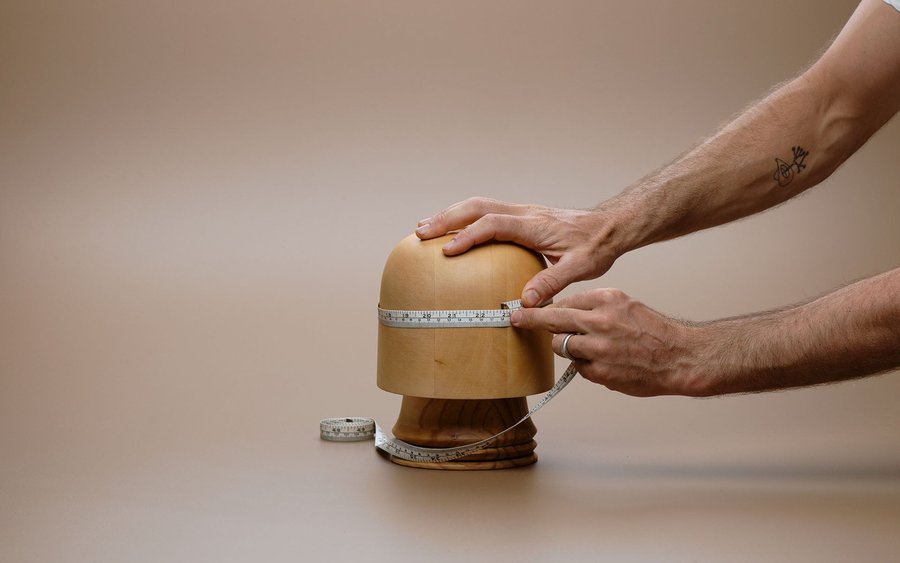
Grab a flexible measuring tape and wrap it around your head, starting from the middle of your forehead — about one inch above your eyebrows — around the widest part of the back of your skull, and back to the front. Do this three times and use the largest measurement. If you don’t have a measuring tape, a shoelace or phone charging cable works fine — just mark the overlap point and measure the length against a ruler.
Most airsoft helmets come in a single “adjustable” size that fits head circumferences between 54 and 60 cm, which covers the vast majority of adult heads. The internal dial adjustment and removable foam pads handle the fine-tuning. If your measurement falls at either extreme — below 54 cm or above 60 cm — check the specific product listing carefully, as some brands offer separate S/M and L/XL shell sizes.
One thing most sizing guides skip: try the helmet on with the goggles and face mask you plan to wear. Some goggle frames push the helmet up slightly, changing the effective fit. Adjusting the helmet in isolation and then discovering it doesn’t work with your goggles on game day is a frustrating experience you can easily avoid.
Usage and Maintenance Tips
Once you’ve got your helmet, a few practical details will make the experience much better. Start with proper adjustment — many people strap on a new helmet and head straight to the field, only to have it bouncing around on their head every time they sprint. Spend a few minutes properly setting the rear dial and chin strap so the helmet sits securely. The correct position places the front edge about one to two centimeters above your eyebrows — not pushed down onto them, and not tilted back to expose your entire forehead.
The internal foam pads will compress and deform over time with regular use. Plan to replace them every six to twelve months. The good news is that most helmets use hook-and-loop mounted pads, making replacement simple, and aftermarket pad kits typically cost just a few dollars.
For cleaning, wipe the shell and chin strap with a damp cloth after each use to remove sweat. The foam pads can be removed and hand-washed or sprayed with rubbing alcohol for disinfection. Don’t submerge the entire helmet or throw it in a washing machine — the ABS shell handles water fine, but prolonged soaking can weaken the adhesives used in the interior assembly.
Your First Helmet Build: Step-by-Step Setup
You’ve picked a helmet and it just arrived in the mail. Now what? Slapping on every accessory at once is tempting but counterproductive — you’ll end up with a top-heavy mess that shifts around when you sprint. The trick is building your setup in layers, testing each addition before adding the next one.
Start with fit. Put the bare helmet on your head, tighten the rear Occ-Dial until it feels snug but not squeezing, and adjust the chin strap so you can fit one finger between the strap and your jaw. Now shake your head vigorously — side to side, up and down. If the helmet shifts more than a centimeter in any direction, tighten the dial another click. A poorly fitted shell makes everything else wobble, so don’t rush this step.
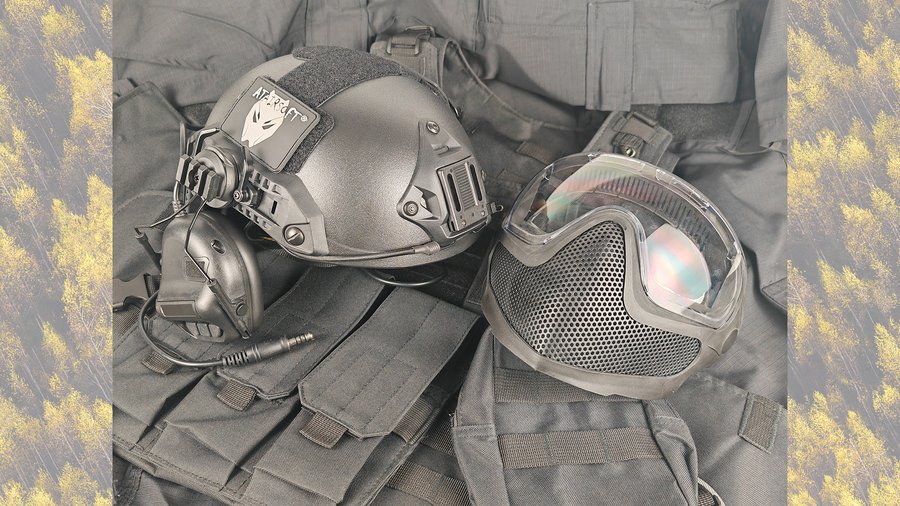
Next, integrate your eye and face protection. Put on your goggles and mesh mask, then put the helmet back on over them. Check for gaps between the helmet’s front brim and the top edge of your goggles — this is the most common weak point where BBs sneak through at close range. Adjust the helmet’s angle forward or back until the brim sits flush against the goggle frame. If there’s still a gap, a thin strip of foam adhesive along the inside of the helmet’s front edge solves it permanently.
Once protection is sorted, mount your camera. The front NVG shroud accepts a standard NVG-to-GoPro adapter — these cost under ten dollars and bolt on in seconds. Position the camera so it sits just above your eye line when recording. Tighten the thumbscrew firmly; a GoPro that wiggles captures unwatchable footage. Run a quick test recording to check the angle before heading to the field.
If you plan to run tactical headsets, attach the ARC rail adapters to the side rails now. Slide the adapter into the rail channel, lock it in place with the retention screw, and hang your headset earpieces. The earpieces should sit over your ears without pressing too hard — you’ll wear these for hours, so comfort matters more than a death grip. Toggle the headset between the “up” position (resting against the helmet when not in use) and the “down” position (covering your ears) a few times to make sure the swing arm moves freely.
Finally, if you’ve mounted a camera up front and headsets on the sides, you might notice the helmet feels front-heavy. A simple counterweight pouch velcroed to the back of the helmet — loaded with a few hundred grams of steel or even spare batteries — restores the balance. This sounds like an unnecessary detail until you’ve spent three hours with a helmet slowly tipping forward onto your goggles. MilSim players running night vision consider counterweights mandatory; even casual players with a GoPro benefit from the added stability.
That’s it — five layers, each one tested before adding the next. Resist the urge to mount accessories you don’t actually use. Every gram on your head compounds into neck fatigue over a long game day. Start minimal, add what you genuinely need, and leave the rest in your gear bag.
One more thing about padding, because it’s the single most under-discussed part of a helmet build: the foam that comes in a budget shell is often little more than shaped styrofoam. It feels fine for the ten minutes you try it on at home, and it gives you a splitting headache by hour three of a game day. Players who run the same shell with a proper memory-foam pad set — either an aftermarket kit or genuine Ops-Core pads — routinely describe wearing it all day and forgetting it’s there. If you only upgrade one thing on a cheap helmet, upgrade the padding before you buy a single rail accessory.
The other detail worth knowing before you commit is the difference between a FAST cut and an ARC cut, which matters enormously if you run comms. A FAST rail runs in a straight line along the side of the shell; an ARC cut curves upward over the ear, leaving more clearance underneath. With a straight FAST cut, some headsets get pushed down slightly onto the ear, and when you’re actually sprinting you can hear the earcup knocking against the shell — a small annoyance in the shop, a genuinely distracting one when you’re trying to listen for footsteps. Glasses wearers should be doubly careful here: a deep-cut MICH plus comms plus glasses arms means three things pressing on the same two centimeters of your temple, and you will feel it all day.
Does Your Helmet Actually Slow You Down? Time It and Find Out
Here’s a question almost nobody asks before dropping $50 on a shell: what does a helmet do to how fast you shoot? Everyone debates weight in grams and protection levels, but almost no one measures the thing that actually decides gunfights on the field — the time from spotting a target to landing your first BB on it.
The reason a helmet can cost you time isn’t the weight. It’s the three small changes it makes to your shooting position. The brim sitting flush against your goggles slightly narrows your upward field of view, so you pick targets up a fraction later. A headset earcup or an ARC rail can catch the top of your stock and change where your cheek lands on the weld, which means your first shot is aimed from a marginally different position than it was in practice. And a front-heavy setup with a GoPro mounted up top makes your head sit fractionally forward, subtly altering how you drive the gun onto target. None of these are big enough to notice by feel. All of them are big enough to measure.
The test takes ten minutes and costs nothing. Set your replica down at low ready, put a target at CQB distance, and run five reps bare-headed: start beep, bring the gun up, one shot on target. Note the average. Then put on your full helmet setup — goggles, headset, camera, everything you’d actually wear — and run five more. Compare the two averages. A gap under about two-tenths of a second is just the cost of wearing protection, and it’s a trade every sane player takes. A gap of half a second or more is not the helmet’s fault; it’s a configuration problem, and it’s fixable. Usually it’s the goggle-to-brim gap forcing you to tilt your head back, or a headset that’s fouling your cheek weld.
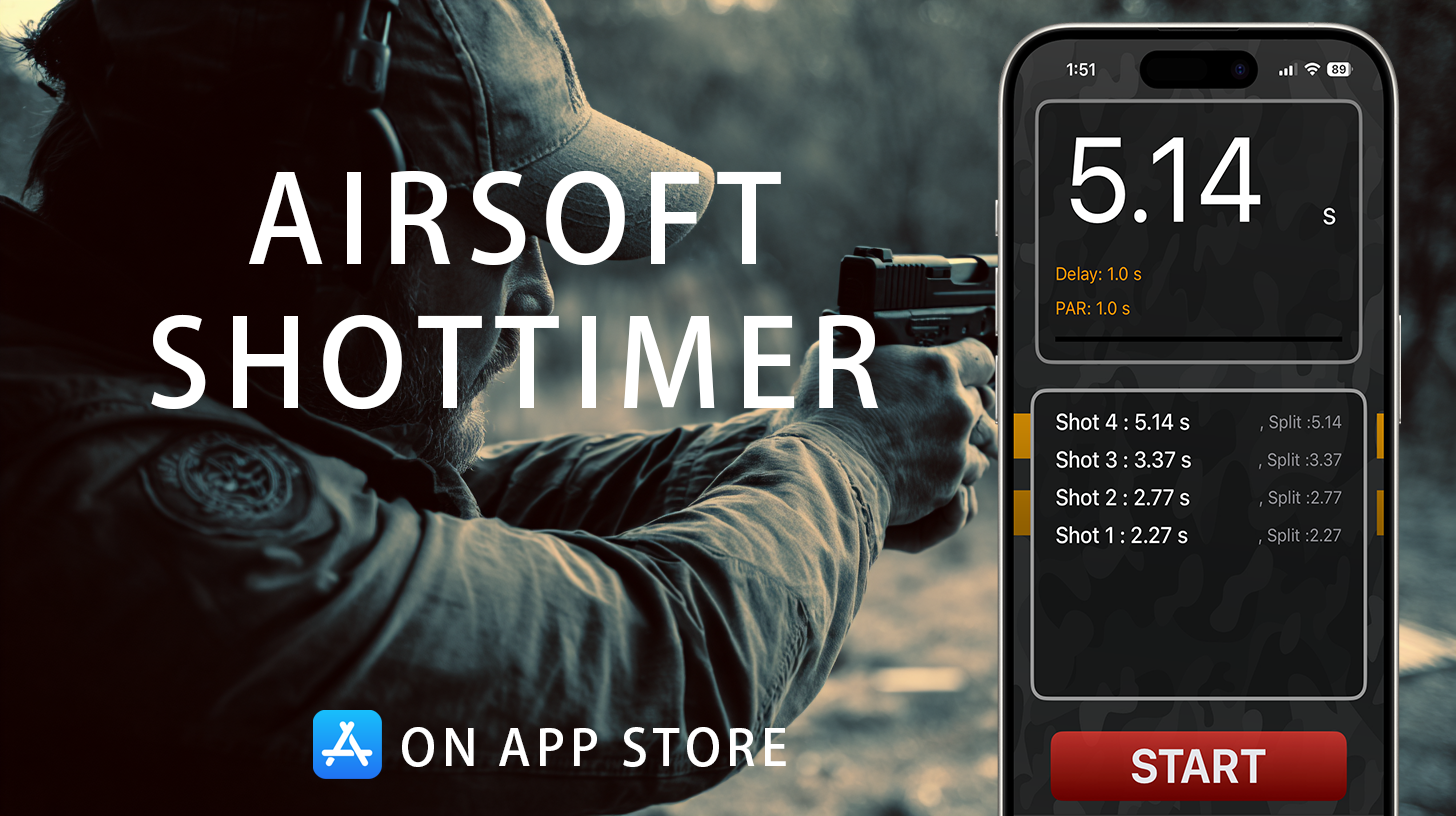
To get numbers you can trust, you need something that actually records the interval rather than you counting in your head. The free Airsoft Shot Timer App turns the phone in your pocket into exactly that: it gives you the start beep, listens for your shot, and logs the elapsed time so you can compare a bare-headed run against a fully-kitted one side by side. It’s tuned to pick up the low-decibel report of airsoft replicas and dry-fire clicks, which matters here — a hardware range timer built for live fire will often miss an AEG entirely indoors. Run the comparison once when you first build your helmet, then again after any significant change to the setup. Most players are surprised twice: first that the penalty is smaller than they feared, and then that a five-minute adjustment to their goggle fit erased most of what was left.
This is also the fastest way to settle the endless “does a heavier helmet actually matter” argument for your own build. Instead of taking a forum’s word for it, add the counterweight, mount the NVG dummy, and time yourself with and without. If the numbers don’t move, mount whatever you like and enjoy the look. If they do, you now know exactly what that accessory costs you — and you can decide whether it’s worth it with real data instead of vibes.
3 Helmet Mistakes That Waste Your Money
After watching dozens of new players show up with helmets that clearly aren’t working for them, the same three mistakes come up over and over. Each one is easy to avoid once you know what to look for.
The first mistake is buying the cheapest helmet on Amazon and then spending $80 on accessories for it. A $12 helmet with a thin ABS shell and flimsy rails sounds like a bargain, but the moment you mount a GoPro and a headset adapter, the rails crack or the NVG shroud bolt strips out. You end up replacing the helmet anyway and re-buying all the mounting hardware. A $35 Emerson or FMA gives you rails and a shroud that actually hold up under accessory weight — the $20 premium pays for itself the first time you don’t have to duct-tape your camera mount back together mid-game.
The second mistake is ignoring goggle integration. Players buy a helmet, buy goggles separately, and never test them together before game day. Then they arrive at the field and discover a two-centimeter gap between the helmet brim and the top of the goggles — a gap that BBs find with frustrating regularity in CQB. The fix is simple: always try your helmet on with your goggles and face mask before you leave the house. If there’s a gap, either adjust the helmet angle or apply a strip of adhesive foam inside the front brim. Five minutes of fitting at home saves you a painful welt on game day.
The third mistake is overloading the helmet from day one. First-time helmet buyers tend to mount every accessory they can find — camera, headset, flashlight, IR marker, counterweight, velcro patches — before they’ve even played a single game. The result is a 1.5-kilogram brick on their head that causes neck strain by the second hour. Start with the bare helmet and goggles. Play one game. Then add the one accessory you actually wished you had during that game. Build your setup gradually based on what you genuinely need, not what looks cool on Instagram.
Conclusion
The right helmet gives you the confidence to peek corners and push aggressively, instead of hiding behind cover because you’re dreading a headshot. Functionally, it’s the platform for your camera, headset, and tactical accessories. Experientially, it’s the piece of gear that makes you hurt less and play more.
If you don’t have a helmet yet, start with a mid-range FAST PJ. Pair it with the goggles and face mask you already own, and try one game with it. Trust me — after that first session, you’ll understand why this guide calls the helmet the most underrated piece of airsoft gear.
Frequently Asked Questions
What’s the best FAST helmet for 2026?
For most airsoft players in 2026, the Emerson FAST PJ ($35-50) is the best FAST helmet overall — the sweet spot of build quality, accessory compatibility, and price. If you’re on a tight budget, the ATAIRSOFT FAST PJ ($15-20) gets you on the field without burning your wallet. For tactical headset users, the FMA FAST Maritime ($25-35) gives you extended side rails for cleaner ARC mounting. And if money is no object, the genuine Ops-Core FAST Bump ($200-300) is the real-deal replica that started the FAST revolution. Skip the $10 Amazon no-names with cracked rails — a $35 mid-range FAST helmet pays for itself the first time you don’t have to duct-tape your camera mount back together mid-game.
Do I need a helmet for airsoft?
A helmet is not mandatory at most airsoft fields — sealed impact-rated goggles are the only universally required protection. That said, helmets are strongly recommended, especially for CQB. A BB hitting your unprotected forehead or temple at close range leaves welts that last for days, and indoor environments have hard walls and doorframes you might collide with during fast-paced gameplay. Beyond protection, helmets give you a mounting platform for cameras, headsets, and lights. Most players who try a helmet once never go back to playing without one.
What’s the real difference between FAST and MICH helmets?
FAST helmets use a high-cut design that exposes the ears, weigh 600-750g, and run headsets cleanly — they’re built for tactical mobility. MICH helmets use a mid-cut design that covers the ears, weigh 750-900g, and offer more protection against side impacts and branches. Pick FAST if you want headset compatibility and lighter weight (about 90% of players), MICH if you want maximum coverage for woodland play.
Which is better, FAST or MICH for airsoft?
For most airsoft players, FAST wins. The ventilation, headset compatibility, and rail accessories matter more than the extra coverage MICH provides. Go FAST unless you specifically want the classic ACH silhouette or you play heavy woodland where ear-area branch strikes are a constant hazard. Even then, a FAST PJ with a helmet cover handles most situations MICH is supposedly better at.
What size airsoft helmet do I need?
Measure your head circumference by wrapping a flexible tape around your forehead about one inch above your eyebrows and around the widest part of the back of your skull. Most adults measure between 54 and 60 cm. The majority of airsoft helmets are sold as “one size fits most” with internal dial adjustments and removable foam pads to fine-tune the fit. If your measurement is below 54 cm or above 60 cm, look for brands that offer separate S/M and L/XL shell sizes.
Can I use a bike helmet or skateboard helmet for airsoft?
Technically yes, but it’s not a great idea. Bike and skate helmets are designed to absorb a single major impact and then be replaced — the foam crushes permanently. They also lack NVG shrouds, side rails, and the military aesthetic most players want. More importantly, they’re often heavier than purpose-built airsoft helmets and have poor ventilation for the sustained physical activity of a game day. A dedicated airsoft FAST helmet is lighter, cooler, more modular, and cheaper than most quality bike helmets.
What’s the best helmet for glasses wearers?
The helmet itself isn’t usually the problem — it’s the goggles underneath. Look for OTG (Over The Glasses) goggles with deep internal frames that accommodate your prescription glasses without pressing them into your face. Popular choices include the Pyramex I-Force OTG and the IeyeIux AG02. Pair these with a FAST PJ helmet and make sure there’s no gap between the goggle’s top edge and the helmet’s front brim. Some players prefer low-profile goggles like the ESS Profile NVG, which have enough internal clearance for most glasses frames and integrate cleanly with FAST helmets.
What accessories should I put on my helmet first?
Start with fit and face protection — get the shell adjusted and your goggles integrated before adding anything else. After that, a camera mount is the most popular first accessory since many players buy a helmet specifically to film gameplay. Tactical headset adapters come next if you play with a team and need communications. Avoid mounting accessories you don’t actively use; every unnecessary gram adds up over a full game day and contributes to neck fatigue. A common beginner mistake is bolting on flashlights, IR markers, and counterweights all at once before even playing a single game — you won’t know what you actually need until you’ve been on the field.
Do I need a counterweight on my airsoft helmet?
Only if you’ve mounted something heavy on the front — typically a GoPro, a night vision device, or a bright tactical light. Without front-mounted gear, a counterweight just adds unnecessary weight. With a GoPro (roughly 150 grams), most players find the balance tolerable without a counterweight for games under three hours. But for full-day MilSim events or if you’re running a heavier camera rig, a 200-400 gram counterweight pouch velcroed to the back of the helmet makes a significant comfort difference. You’ll feel it most when looking down at your gun or checking your magazine — without the counterweight, the helmet slowly tips forward and presses into your goggles.
What’s the difference between PJ, BJ, and MH FAST helmets?
All three are FAST helmets with the same high-cut design, but they differ in ventilation and rail configuration. PJ (Parachute Jumper) has the largest ventilation holes — best for hot weather and the most popular choice overall. BJ (Base Jump) has smaller vents and a slightly more complete shell profile, offering a middle ground. MH (Maritime Helmet) has extended side rails that give you more mounting space for accessories like headset adapters and IR markers. For most players, PJ is the right answer. Choose MH only if you’re building a heavily accessorized setup that needs extra rail space.
What’s the best airsoft helmet for a complete beginner?
If you’ve never worn an airsoft helmet before, start with an FMA FAST PJ in the $25-35 range. It’s cheap enough that you won’t feel burned if helmets turn out not to be your thing, but solid enough that the rails and NVG shroud can actually handle accessories if you decide to build on it later. Pair it with the goggles and mask you already own, test the fit at home, and play one game before buying any accessories. Most beginners who start with a budget $12 helmet end up upgrading within two months — the FMA skips that throwaway step.
How heavy should an airsoft helmet be?
A bare airsoft helmet shell typically weighs between 600 and 900 grams, depending on the type and brand. FAST helmets tend to sit around 600-750g, while MICH helmets run 750-900g because of the extra shell coverage. Once you add accessories — a GoPro (150g), headset adapters (100g each side), and a helmet cover (80-120g) — a fully loaded FAST setup weighs roughly 1.0 to 1.3 kg total. If your complete setup exceeds 1.5 kg, you’ll start feeling neck fatigue after two to three hours of active play. Keep the total weight under 1.3 kg if you can, and add a counterweight only when front-heavy accessories make the helmet tip forward.
What is the 2-2-2 rule for helmets?
The 2-2-2 rule is a quick fit check borrowed from the motorcycle and tactical helmet world: roughly two finger-widths of shell above your eyebrows, two fingers of clearance between the chin strap and your jaw, and a helmet that shifts no more than two centimeters when you shake your head hard. It’s a rough-and-ready standard rather than an official specification, but it catches the three failures that matter most in airsoft — a shell riding so high it leaves your forehead exposed, a chin strap so tight it gives you a headache or so loose the helmet flies off when you dive for cover, and a retention system that lets everything wobble the moment you sprint. Run the check with your goggles on, not bare-headed, since goggles change how the shell sits.
What if my airsoft helmet is too big?
Start with the internal pads before you consider returning it. Most FAST and MICH shells ship with a modular hook-and-loop pad set, and a thicker pad kit (or simply doubling up the crown pad) takes up a surprising amount of slack for around $15. Tighten the rear Occ-Dial fully first to see how much of the gap that closes on its own. If the helmet still rocks side to side with the dial maxed out and thicker pads fitted, the shell genuinely is the wrong size — most brands offer M/L and L/XL, and dropping a size is the right fix. One thing not to do is compensate with an over-tightened chin strap: that pulls the shell down onto your goggles instead of stabilizing it, and you’ll spend the whole game pushing it back up.
Does wearing a helmet slow down your shooting?
Slightly, and far less than most players fear — but the honest answer is that it depends entirely on your setup, which is why it’s worth measuring rather than guessing. A helmet doesn’t slow you down through weight so much as through three small changes: the brim trimming your upward field of view, a headset earcup or ARC rail interfering with your cheek weld, and front-mounted accessories shifting your head position. Run five reps of target acquisition bare-headed, then five in full kit, and compare the average times using the free Airsoft Shot Timer App — it registers the low-decibel report of airsoft replicas that a live-fire range timer usually misses. Under two-tenths of a second of difference is normal and worth the protection. Half a second or more means something in your configuration is fighting you, most often a goggle-to-brim gap that forces you to tilt your head back to see.
Are airsoft helmets bulletproof?
No — airsoft helmets are non-ballistic shells. They’re made of ABS plastic, polymer composite, or in rare premium cases carbon fiber, designed to absorb BB impacts (which carry roughly 1-2 joules of energy) and provide impact protection in case of falls or collisions with cover. They are not rated to stop bullets, knives, or any high-velocity threat. Genuine ballistic helmets like the actual military Ops-Core FAST or MICH ACH cost $800-2,500 and use Kevlar or UHMWPE composite shells — those exist in the real-steel market but are not what you’re buying when you order an airsoft FAST helmet on Amazon for $30. If a listing claims “ballistic protection” at airsoft prices, it’s marketing fiction. Don’t take an airsoft helmet anywhere where actual ballistic protection matters.
Why does my airsoft helmet keep falling forward or sliding around?
Three common causes, in order of frequency. First, the rear Occ-Dial isn’t tight enough — most beginners under-tighten because they expect a helmet to feel snug, not gripping. Click the dial in until you feel firm pressure all around your skull, then back off one click. Second, you have front-heavy accessories (GoPro, NVG, flashlight) without a counterweight. Add a 200-400g counterweight pouch to the rear retention strap and the balance will return. Third, your chin strap is too loose — you should fit one finger between the strap and your jaw, no more. If all three are correct and the helmet still slides, your shell may simply be too large; try the same model in a smaller size or with thicker internal foam pads.
How do I attach NVGs or a GoPro to my airsoft helmet?
The front of every modern FAST or MICH helmet has an NVG shroud — a three-prong or three-hole interface designed to accept night vision mounts. For a GoPro or action camera, buy an NVG-to-GoPro adapter (under $10 on Amazon, search “NVG mount GoPro adapter”). It bolts to the shroud with the included thumbscrew, and your GoPro clicks onto the standard mount on the adapter. For real night vision (PVS-14, PVS-7, or replicas), use a J-arm or dovetail mount that matches your specific NVG model — these typically run $20-40 and require an additional rhino mount on the shroud. Either way, the shroud itself accepts standardized mounting hardware, so you don’t need to drill into your helmet. Just make sure the helmet’s shroud is metal-reinforced (not pure plastic) before mounting anything heavier than 200 grams.
Can I use an airsoft FAST helmet for cosplay or streaming?
Absolutely — and it’s the smart move. Cosplayers and streamers who want the operator look almost never need a real ballistic helmet, and an airsoft FAST replica gives you the identical high-cut silhouette, a working NVG shroud, and side rails for a tenth of the price. A clean Emerson or FMA FAST PJ photographs and films well, takes paint and weathering without guilt, and the front shroud is perfect for mounting a webcam, a key light, or a dummy NVG for that authentic profile. For most game-inspired or modern-military builds (Task Force 141, Helldivers, Ghost Recon), a PJ or BJ replica nails the shape; switch to a MICH 2000 replica only if your reference character wears a chunkier, ear-covering helmet.
What’s the difference between an airsoft FAST helmet and a real ballistic one?
Two things: protection and price. A real ballistic FAST helmet — the genuine Ops-Core FAST SF, Team Wendy EXFIL, and similar — uses a Kevlar or UHMWPE composite shell rated to NIJ IIIA to stop handgun rounds, and costs roughly $800-2,000. An airsoft FAST helmet is a non-ballistic “bump” replica made from ABS or polymer, designed to shrug off BB impacts and minor knocks, and costs $15-300. They look nearly identical and share the same rail and shroud dimensions, so accessories cross over freely. Unless someone is firing live ammunition at you, the replica is the correct choice for airsoft, cosplay, streaming, and photography — paying ballistic prices for any of those uses buys you protection you’ll never actually need.
What’s the best helmet setup for night airsoft games?
Night airsoft requires three things on your helmet: an IR strobe or IFF marker for friend-or-foe identification, a tactical white-light or IR illuminator (mounted to the front rail or NVG shroud), and ideally a real or replica night vision device. The minimum viable setup is a FAST PJ with a $30 IR marker velcroed to the rear, a Streamlight Sidewinder or replica clipped to the side rail, and either a GoPro for documentation or a passive NVG replica for atmospheric realism. Most fields running night ops require at least the IR marker — without it, teammates can’t distinguish you from opponents in the dark. Budget $50-100 for a basic night kit on top of your existing helmet. For full MilSim night ops with real PVS-14 night vision, expect to add $1,500-3,500 to your helmet setup.
📚 Related Articles
- Airsoft Mask & Goggles Complete Guide - Pairing goggles with your helmet
- Airsoft Loadout Complete Guide - Full gear configuration advice
- Airsoft Vest & Plate Carrier Guide - Matching vests with your helmet setup
- Airsoft CQB Tactics Complete Guide - Helmet use in close-quarters combat
- Airsoft Tactical Headset Complete Guide - Helmet-mounted headset options
- Airsoft Team Tactics Complete Guide - Communication gear and team coordination
- Best IDPA Pistol for Beginners 2026 - First competition pistol guide ($300-1500 budget tiers)
- IDPA Divisions Complete Guide - All 8 divisions explained (SSP, CCP, ESP, CDP, CO, REV, BUG, PCC)
- Shooting Safety Rules Complete Guide - Why protective gear matters
- Shot Timer App Complete Guide - Training with Shot Timer
Put a Shot Timer in Your Pocket
Airsoft Shot Timer is a free shot timer app tuned for airsoft and Action Air — it picks up BB gun shots, tracks your split times, and saves you the cost of a $150+ hardware timer for IPSC/IDPA practice.

- Airsoft Helmet
- Airsoft
- FAST Helmet
- MICH Helmet
- Tactical Helmet
- NVG Mount
- Airsoft Gear
- MilSim
- CQB
- Speedsoft
- Airsoft Loadout
- Tactical Gear
- Helmet Accessories
- Best Airsoft Helmet
- Best Airsoft Helmet 2026
- Best FAST Helmet
- Best FAST Helmet 2026
- FAST Helmet 2026
- FAST vs MICH
- MICH vs FAST
- Airsoft Head Protection
- Helmet Sizing
- Airsoft Helmet Setup
- Airsoft Helmet for Beginners
- Tactical Helmet Airsoft
- Airsoft Helmet Build
- FAST PJ Helmet
- MICH 2000 Helmet
- Airsoft Helmet Accessories
- FAST Helmet for Cosplay
- FAST Helmet for Streamers
- Best Helmet for Gamers
- Airsoft vs Ballistic Helmet
- Bump Helmet
- Helmet 2-2-2 Rule
- Airsoft Helmet Too Big
- Helmet Padding Upgrade
- ARC Cut vs FAST Cut
- Does a Helmet Slow You Down
- Target Acquisition Time
- Shot Timer App